
EMS Synthi-A

EMS Synthi-A
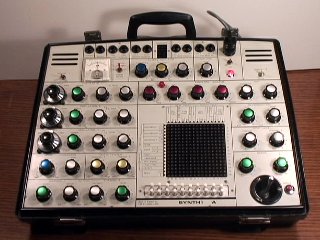
The Synthi-A is a modular synthesizer, manufactured by Electronic Music Studios in the UK. They started production in 1971, and you can still order a new one, but the waiting list is many years long.
The Synthi is housed in a Spartanite briefcase, and includes a built-in amp and stereo speakers. It's modular, but uses a patch-matrix and pins instead of patch cords.
This particular Synthi had many age related issues. Most of the pots were extremely dirty or worn, making it impossible to adjust anything with accuracy. Pins in the patch matrix didn't seem to always make contact, the filter sounded very rough, and the envelope generator was touchy. As well, I could tell the power supply was running very hot. I could feel the heat through the case.
Synthi Circuit Boards Before Repair

Synthi Circuit Boards Before Repair
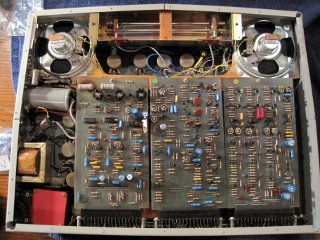
Here is what it looked like on first inspection. There are 3 circuit boards in the Synthi, labeled A, B, and C (from left to right).
You can see some burn marks on the top of board A, and there is a bad capacitor replacement repair to the left of it. The brown electrolytic capacitor is just floating around, waiting to short out on something!
Along the top ridge of the circuit boards there is a strip of foam where they are screwed into the chassis. I should say, there was a strip of foam there. It seems to have deteriorated, and turned into dust. This is probably what's clogging up the patch matrix. The foam on the spring reverb tank and the speakers is also flaking away. This can cause issues with vibration in the case, and makes the reverb sound gritty.
The original power supply design on the Synthi is underpowered. This causes it to run very hot, and can cause tuning and calibration issues.
Synthi Power Supply Burn Marks

Synthi Power Supply Burn Marks

Synthi Power Supply Burn Marks

Synthi Power Supply Burn Marks
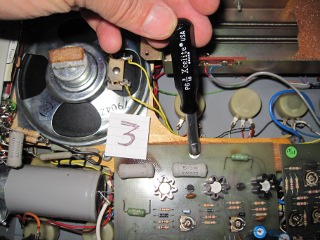
The unit I was repairing was no exception, as you can see from the photos above. In the first photo you can see major charring by one of the power resistors (under the #3 card). There is also some heat damage caused by the smaller green resistor to the right.
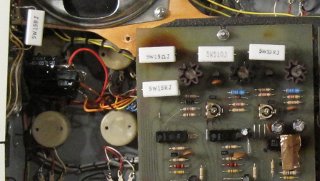
The second photo is the same board, viewed from the bottom. Here you can see the charring in more detail. It got so hot that it lifted some of the original traces. There is also a rather hasty and poor repair attempt by someone in the past. I'll have to redo this, and clean it up.
Rebuilt Power Supply

Rebuilt Power Supply
Almost all of the power supply components were damaged by heat, so I replaced all of them (except for the voltage rectifier).
The capacitors, transistors, and power resistors were also upgraded to run cooler. The most obvious changes are the 5 Watt resistors (white ceramic blocks) replacing the green 3 Watt resistors.
You can also see where I replaced the foam strip across the top of the circuit board.
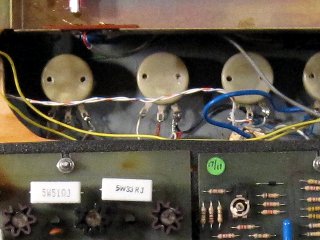
The potentiometers in the Synthi are of a sealed design. The idea is that if you seal the case of the pot, dirt and grime can not enter, and you'll never need to clean them. However, the conductive surface inside the pot will wear down over time, introducing dust. It will combine with the lubricant inside the pot, and make a grimy mess.
Cleaning Sealed Pots

Cleaning Sealed Pots
My approach is to drill 2 small holes into the case of each pot. It's then possible to clean the inside with contact cleaner. The second hole is to allow the excess cleaner and dirt to drain out.
I also took this opportunity to partially remove the patch-matrix, and clean each of the pin jacks.
Once all of the moving electrical contacts were clean, most of the features of the synth came back to life.
Diode Ladder Filter

Diode Ladder Filter
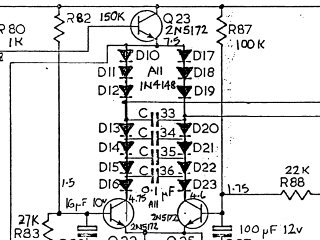
Here is a schematic of the Synthi diode ladder filter. The diodes and capacitors make a distinct ladder shape, and this is the reason for the name. The Synthi filter is essentially a Moog transistor ladder filter, with diodes in place of transistors. However, this causes the Synthi filter to sound 'wetter'.
The audio input of the filter is at the bottom (through the balanced transistor pair), and the output is from the middle of the filter, through the two traces extending to the right. The cutoff frequency is set via a bias current on the bottom transistor pair. Resonance is caused by a feedback loop.
It is important that the voltage drop across each pair of diodes is the same (or very close). If not, the filter response will be non-linear, and not very musical sounding.
Diode Ladder Filter

Diode Ladder Filter
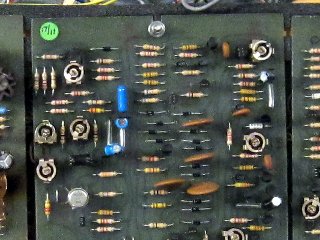
Originally, the filter on this Synthi sounded extremely rough (crunchy might be a better word). This photo shows the circuit board with the filter. The diodes are the small black components, and the capacitors are the 4 brown disc shaped components.
I desoldered one leg of each of the diodes, and measured the voltage drops across them. As I suspected, the values were quite varied. I'm assuming that when it left the factory, the filter was silky smooth. This probably means that heat had caused the voltage drops to drift over time.
I replaced the outliers, and re-matched up the remaining pairs.
Before I did a final calibration of the Synthi, I replaced all of the electrolytic and film capacitors. They tend to drift in value over time (especially with heat), and this makes it impossible to adjust oscillators and other modules to ranges that are musically useful.
EMS Synthi Technical Overview
EMS Synthi Technical Overview